Wednesday, 20 March 2013

Cozy, Warm, Feet

Recently I've been working on knitting up a pair of socks for myself. I looked around online and couldn't find a good pattern, with good clearly written steps, for a simple ankle sock- so I wrote my own. I've created a pattern that requires little prior knowledge (you should know how to long tail cast on, knit stitch and purl stitch), with plenty of supplemental materials to teach you the new techniques required to make these socks (picking up stitches, magic loop method, ssk decreases, etc). It is all laid out super simply so that you can make these socks without much difficulty at all even if you just learned how to knit!


The resulting socks are super cozy, warm and durable! 


What you'll need to make these socks:
-200 yards of worsted weight yarn
-size US5 circular needles with a cord of at least 32"
-a tapestry needle
-This pattern! - I'm selling it for only $3! 

Or, if you would just like me to knit you a custom pair of socks, I can do that too! 

**Remember! Today's the last day of my Hello Spring Sale! Use code SPRING10 at checkout and receive 10% off anything in my shop!"

Happy Crafting!

Tuesday, 19 March 2013

How To Make A Light Box

For quite a while now I've been wanting a light box to help me photograph my Etsy items, but I've been putting this project off because I didn't have space for it, or I thought it would be a difficult project. Turns out, it's super simple to make a light box! And you save a lot of money by making your own instead of buying one too!

Here's how to do it:

What you'll need:
-A small box
-A white sheet you don't mind destroying
-Duct tape
-Scissors
-A box cutter or sharp knife
-Double sided tape
-Stapler

Step 1: Tape up the bottom of the box. Cut out 3 sides of the box, leaving about 1 1/2" as a frame. Cut off 3 box flaps from the front, leaving just the bottom one. 


Step 2: Put double sided tape everywhere! Corners, and top especially. Then comes the tricky part. Carefully start pressing your white sheet into the box, sticking it to the tape. Pulling tight to (try to) prevent wrinkles, and cutting excess fabric as you go. This might take some time. Also, try to only have seams at the corners. Use staples on the top for reinforcement against gravity- making sure that they are as inconspicuous as possible. 


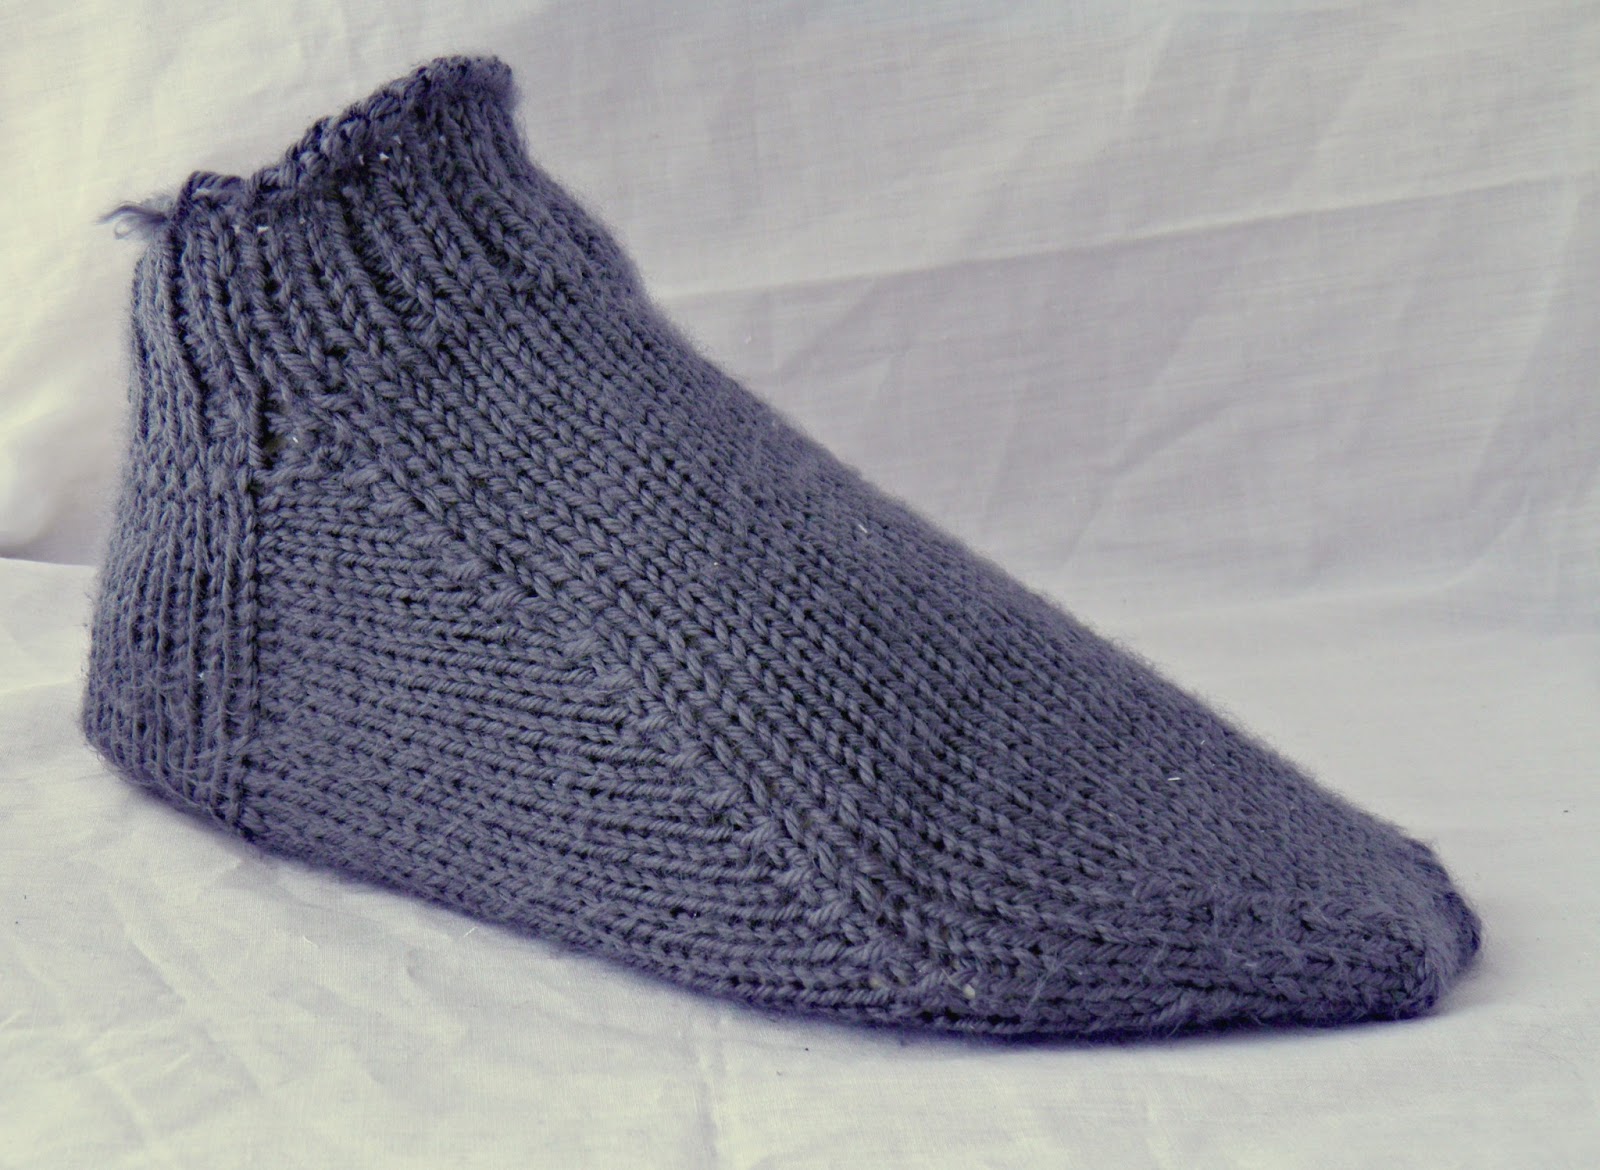
Step 3: You have a light box! Now just add light sources. In the photo above I have placed the box by a sunny window. Notice how there aren't any really harsh shadows? Alternatively, you can put lamps facing toward each open side. The sheet will allow light in, while diffusing it to make it softer. 


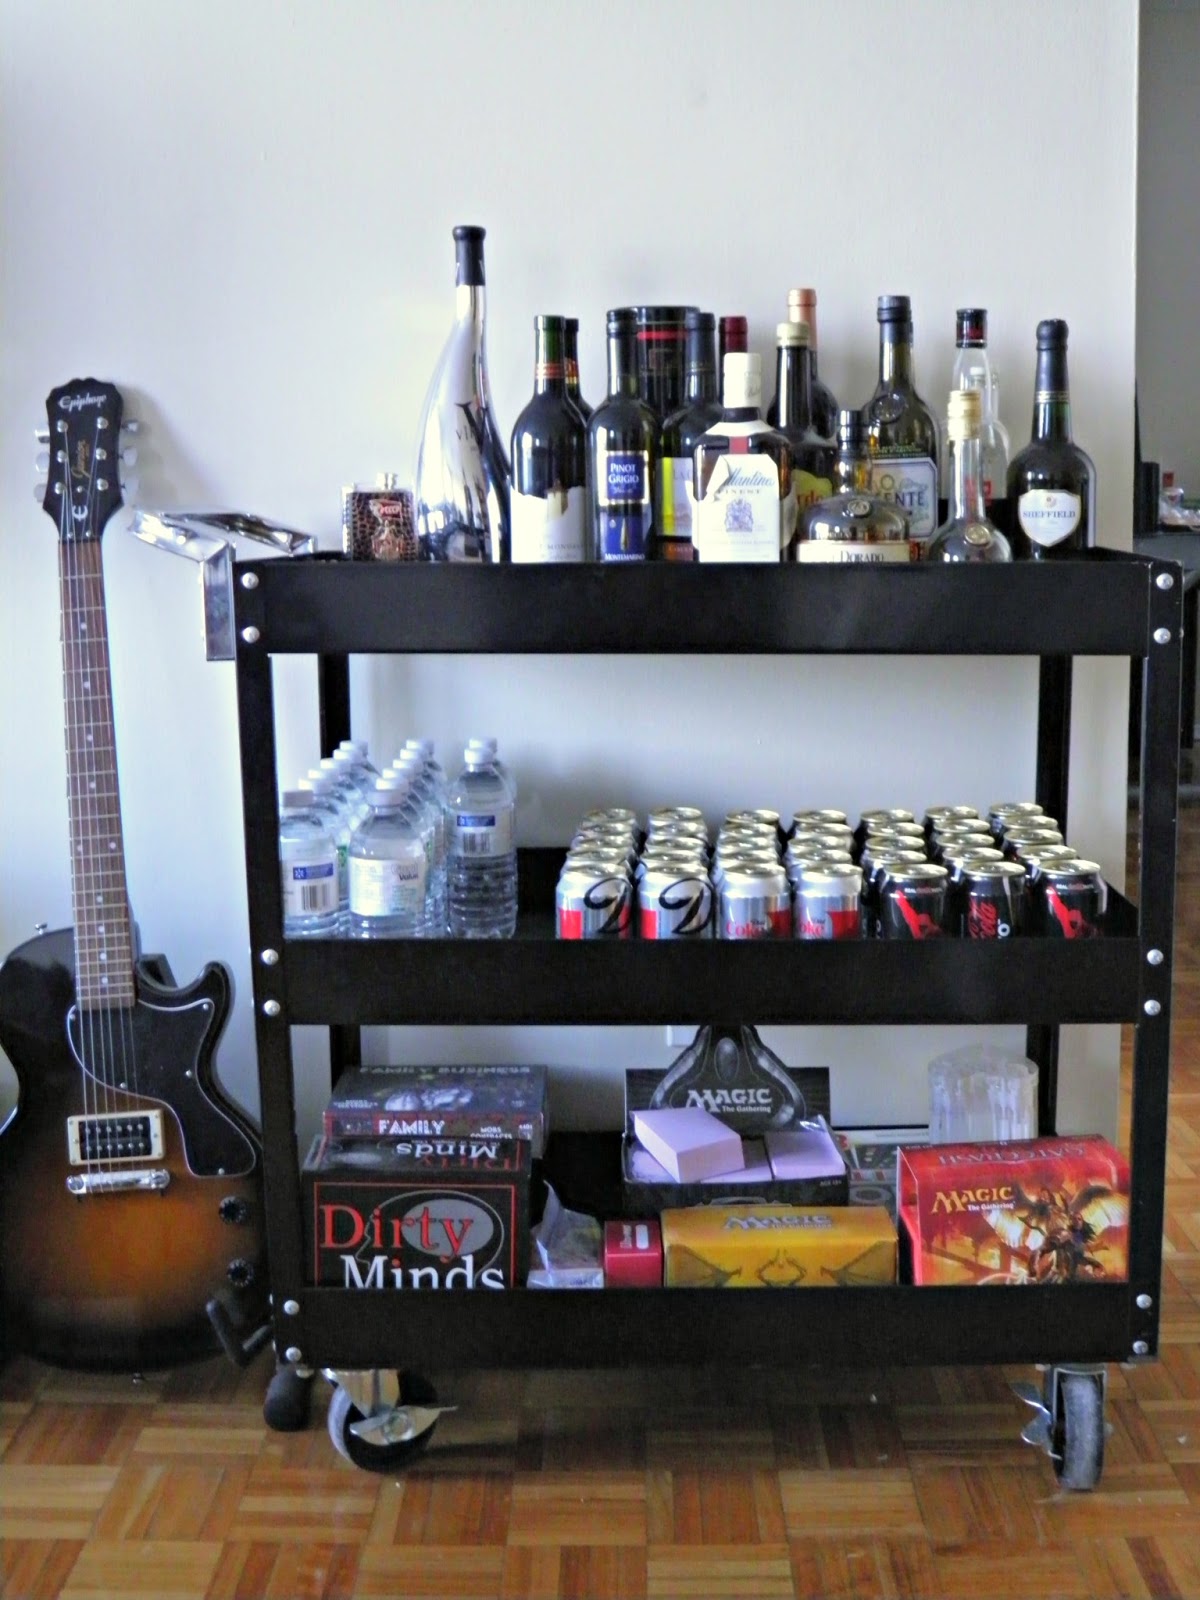
 These photos are unedited to show you how great the box works. It allows for a simple background, and soft shadows, allowing your subject to pop! Here is an example of the same subject, same place, without the light box:

Dark shadow, harsh glare, busy background. You can really see how much a light box helps!

And lastly, here's the same photo from above, just edited a little:

I simply boosted the colours a little to make it stand out. Now just imagine this was an Etsy item- the picture would show off the product splendidly, no? 

Happy Crafting! 


Monday, 18 March 2013

Sweet-Tart Sweetheart Apple-Cranberry Pie

Super late, I know, but I just can't resist posting a pie recipe for PI day!

So for the first time in years, I didn't bake a pie on PI day. I had a good reason though! Bill Nye The Science Guy came to town to speak and I was lucky enough to get tickets (they sold out in the first 6 hours of being listed)! It was awesome. He spoke to us not like children, even though he was primarily a children's entertainer (and engineer), but like people with power to change the world! It was really super inspiring, and I think a good reason for not having time to bake a pie.

So today I give you one of my old favourite pie recipes that I posted on my old blog a little over a year ago. Sweet-Tart Sweetheart Apple-Cranberry Pie.


The pie is sweet from the apples, the buttery crust, and the streusel topping, and it is balanced out with the addition of delicious tart cranberries. It is one of my favourite pies to make, eat and give! I've never met a person who hasn't loved this pie!


I like to make this pie in mini pie tins because it's cuter, and easier to give to someone. (It's also a good way to make sure you don't eat a whole big pie in one sitting!) 

Ingredients:
Base:
-1 batch of this pie dough recipe, with the zest of 1 lemon or orange and 2tsp cinnamon added in. Chilled.

Filling:
-2 cups fresh cranberries
-2 large apples (I like Gala for this), peeled and cut into small cubes
-2/3 cup sugar
-juice from half a lemon or orange (about 1 1/2 tbsp)
-1/2 cup AP flour

Topping:
-1/2 cup AP flour
-1/2 cup sugar
-1/2 tsp cinnamon
-1/4 tsp nutmeg
-1/4 cup cold butter, cubed

Roll out dough and fit into the pan of your choice. Trim excess, leaving about 3/4 inch hanging out. Turn the extra dough underneath itself to create an upstanding rim. Chill in fridge until ready to use.

Preheat oven to 400*F.

Put all ingredients for the filling into a bowl and let chill out in the fridge for half an hour.Pour the filling into the chilled pie shell(s) and bake in center of preheated oven for 30 minutes.
Meanwhile, combine first 4 topping ingredients. Cut in butter and rub together until the mixture is the consistency of coarse sand. Chill until ready to use.

Remove pie from oven. Turn down temp to 375*F. Sprinkle topping onto pie and press down gently. Return the pie to the oven, rotating so that the side that faced the back of the oven now faces the front. Bake for another 20-25 minutes, or until the filling bubbles thickly around the edges.
Transfer pie to wire rack and cool for at least 1 hour.

Adapted from Ken Haedrich's Pie. 


Sunday, 17 March 2013

Happy St. Paddy's Day!

Happy St. Patrick's Day!

While you're still sober I have a little recipe for you to make as a special St. Paddy's treat! It's a semi-traditional recipe, with my own spin on it. I just can't stand the overly sweet, overly GREEN treats that usually grace tables for this holiday. So I searched for something special, and here's what I found...


Light, fluffy, delicately chocolate and perfumed with cinnamon. Delicious! Enjoy and have a safe St. Paddy's Day!

Chocolate Cinnamon Irish mini Bundt Cakes
  • 1 cup butter
  • 2 1/3 cups granulated sugar
  • 4 eggs, separated
  • 3 1/2 ounces of baking chocolate, finely grated 
  • 1 3/4 ounces wheat germ (originally the recipe called for an equal weight of ground almonds, but I'm allergic and the texture is similar)
  • 1 cup sieved or riced cooked potato 
  • 2 1/2 cups flour 
  • 1 tsp cinnamon
  • 2 rounded tsp baking powder
  • 1/2 tsp salt
  • 2/3 cup milk
  • 1 tsp vanilla
  • 2 tsp cocoa


For the pan:
  • 1 1/2 tablespoons flour
  • 1 1/2 tablespoons cocoa
  • Shortening or cooking spray

Peel, dice and boil 3 small or 2 regular sized potatoes for 15 minutes, or until very tender. Drain and place back into the pot on very low heat, just until the steam dissipates, to dry the potatoes. Once dry, remove from heat and let cool. Once cool, push through a mesh sieve, or if you're fancy, use a potato ricer. Gently push into a cup, being sure not to pack. Be sure NOT to add the potatoes until they are very cool, or they will ruin the cake batter!
Preheat the oven to 350° F / 275° C. Prepare the mini bundt pans by greasing, then dusting with second amounts of flour and cocoa. Please note that one large bundt pan, or a springform pan are okay too. They will require a longer baking time though. (About an hour- 1hr 45mins.)
Grate the chocolate on a fine grater or crush with a mortar and pestle, until very fine. When this is done, sift the flour once by itself. Then sift it a second time with the cinnamon, baking powder, salt, and first amount of cocoa.
Cream the butter with the sugar until light and fluffy. Separate the eggs. Add the yolks, one at a time, to the creamed mixture, beating well after each addition. Stir in the grated chocolate and wheat germ. Add the sieved potato and stir again.
Add the vanilla to the milk. Add the flour alternately with the milk mixture, beating gently until smooth after each addition. Finally, whip the egg whites in a clean, grease-free bowl until stiff, be careful not to over whip and dry out the eggs. Fold the whipped egg whites carefully into the cake mixture.
Spoon the batter into mini bundt pans and tap once to settle. Bake for 45 mins, checking for doneness at 30. Mine only needed about 35 minutes. Remove from the oven and allow to rest in the pan for at least twenty minutes before removing from the pan, then cool on wire racks.
Dust with icing sugar, serve with coffee, tea, or maybe even a pint. Enjoy!


Friday, 15 March 2013

My Drink/ Entertainment Cart

In our last apartment, we didn't have very much space to entertain, so we didn't invite people over much. I want to change that in this new place and make this home comfortable and inviting for guests (and ourselves, of course). So when I saw two very cute drink carts on A Beautiful Mess (here, and here), I knew I had to have one for this new place!


Our drink cart sits just at the edge of our living room, right at the corner of the hallway that leads to our bedroom, my husband's office and the bathroom. It really fits perfectly there, and I love how my husband's guitar fits nicely between it and the entertainment center. It really adds to the room I think. 

We don't drink much, but have accumulated a good number of different sorts of liquors and wines over the years. I put them right on top for display and ease of use. Of course, we keep the freezer stocked with plenty of ice and chilled mixers on hand to mix and match. The center rack holds our extra cans of soda (diet coke and coke zero), as well as extra bottles of water. There's always a few chilling in the fridge too. The bottom rack is my favourite. It's the reason why I call this not just a drink cart, but an entertainment cart. Our boardgame collection. We're super nerdy and love board games/card games- we have way too many Magic The Gathering cards for our own good. 


I love some of the bottles all on their own just for their looks (see that silver, curved, wine bottle on the far left? So cool looking!) This is where we also keep our cigars (Cuban and Panamanian), as well as coasters and our absinthe spoon (we're looking to get an absinthe fountain in the near future too). 

I love the way our drink/ entertainment cart looks in our living room and I'm so glad I get to share it with you! 

Tell me, what is your favourite thing in your livingroom? 


Wednesday, 13 March 2013

Hello Spring Sale!

One week from today is the first day of spring! I'm so excited to start wearing more dresses, eating more fresh (local) produce, and having longer, warmer days! Spring is really the best season.

I've just updated my Etsy shop to include a handful of new (spring) items, and I will be continuing to do so all week.

**Bonus! Use code ' SPRING10 ' at checkout and receive 10% off your purchase of anything in my shop! Good until March 21st.**

Here's what's new:


There's plenty more to come in the next week so stay tuned! 
What are you working on this week?

**Remember! Use code ' SPRING10 ' at checkout until March 21st!**

Monday, 11 March 2013

Ten-Thousand Hours

Currently, one of my favourite artists is Macklemore & Ryan Lewis; I love their thoughtful, and thought-provoking, lyrics as well as their catchy beats. Their newest album The Heist is fantastic through-and-through, but one song in particular speaks to me most. Ten-thousand hours- it's about the concept that if you work hard at something for ten-thousand hours, then you become something of an expert in that subject. Malcolm Gladwell discusses this concept in his book The Outliers, which, by the way, is also fantastic.

My favourite lyrics from the song sum up the idea really well, I think, and are also really inspiring...


Practice makes perfect, and it's okay if in the beginning you aren't very good. With hard work and dedication, you can achieve your dreams. 

I plan on hanging this image in my office, in a black frame, just like my two other, recent, decor posts: "I Can't Do This; But I'm Doing It Anyway"; and "We Are The Makers Of What's Next". For this image, I simply Googled the base photo of black alligator skin (The Heist's album cover is also black alligator skin), and added the text in Photoshop. Easy-peasy. 

What songs do you listen to for motivation?