Showing posts with label crafts. Show all posts

Monday, 29 April 2013

I Made A Dress... Sorta

Hey everyone, remember when I mentioned all the new projects I've been working on? Well today, I'm going to share my favourite. A new dress!... Sorta.

I found a bunch of awesome green knit fabric at a thrift store a couple of weeks ago. It's soft and light, perfect for a new spring/summer dress.

The dress has a circle skirt, and a tank top. 


It also has a lovely braided waistband...


...and neckline. But that's not all...


Surprise! They're actually separates! I love pairing the top with some jeans. I have yet to wear the skirt with a different top, but that will definitely change as the weather warms up. 


Oh, and one of my favourite parts! I used vintage buttons my grandmother gave me to close up the skirt in the back. I love that they don't match. As for button loops, I used embroidery floss and made chinese stair cases. There is also a hook and eye fastener inside the skirt for extra strength. 

If you would like the pattern, it will be up in my Etsy shop in the next week or so!

Happy Crafting!

Sunday, 28 April 2013

Two-Tone Socks!

Hey everyone! I've been super busy making things lately that I haven't even had time to share! Since my last post I've made: A new tshirt, a tank top and skirt set, installed secret pockets into a client's pants, and continued to work on another client's jumpsuit. Oh, and I also made these super cute and comfy socks!

These have a longer cuff than the last ones, and also fit much closer to the foot thanks to the super short gusset. 

I love socks with different coloured heels/toes, but I still wanted to keep with a neutral theme- Black and  white works so well for this!

I'm also considering making a white/black combo (the inverse of these), what do you think?

If you look closely you can see that the black yarn has tiny little sparkles in it. It's quite lovely in person. 

If you'd like to make a pair, I've put up the pattern on Etsy for just $3!

Or, if you don't knit, you can also order a pair from me and I will custom make them for your feet!

Happy Crafting!

Monday, 15 April 2013

I Made A Tank Top

Tank top- DIY. Jeans, David Khan (thrifted). Cardigan, Old Navy. Sock, hand knitted. 

The other day I was out thrifting and found tons of gorgeous cheap fabric! 

 Soft, green jersey. 4 yards! Original price: 2.99, 50% discount- paid 1.49!

 Soft cotton blend knit. About 1 yard. Paid 99 cents! 

(Vintage?) Cotton with cute floral design. About 2 yards. Originally 99cents, 50% discount- paid 49cents!

The first thing I made from my new fabric was a cute tank top with a peter pan collar. 

To make it: 

Step 1: Trace an existing tank top in a similar style to the one you want to make, onto paper. Leave 1/4" extra around for seam allowances. 

Step 2: Cut out pattern and pin to fabric. Cut out fabric (making sure to flip either the fabric or the pattern when you are cutting out the back piece. 

Step 3: Sew the side seams together (right side facing in, of course.) Then hem all the edges except for the collar. 

Step 4: Follow this awesome peter pan collar tutorial that I found: http://transientexpression.com/tutorial-tuesday-peter-pan-collar/

Step 5: Wear your new cute tank top! 

While I don't have anymore of this fabric, I would definitely love to do any custom orders for similar tops. Just request a custom order from my Etsy shop

Happy Crafting!


Wednesday, 20 March 2013

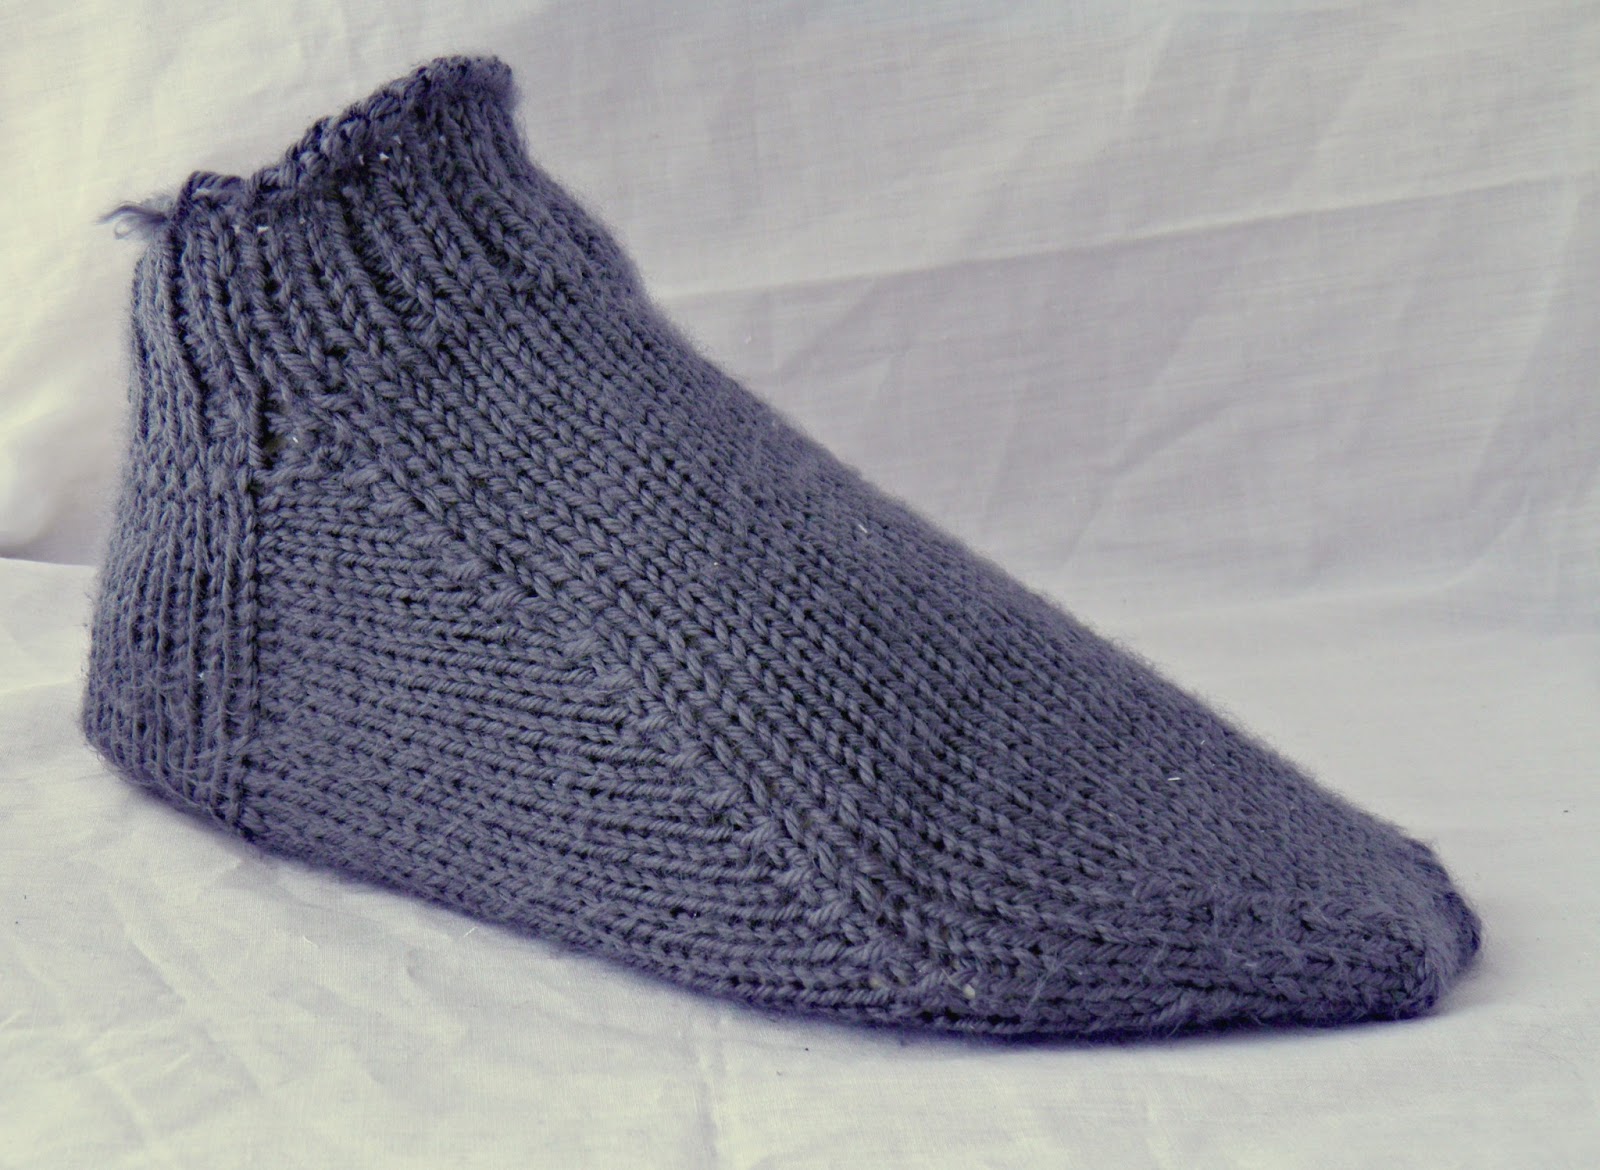
Cozy, Warm, Feet

Recently I've been working on knitting up a pair of socks for myself. I looked around online and couldn't find a good pattern, with good clearly written steps, for a simple ankle sock- so I wrote my own. I've created a pattern that requires little prior knowledge (you should know how to long tail cast on, knit stitch and purl stitch), with plenty of supplemental materials to teach you the new techniques required to make these socks (picking up stitches, magic loop method, ssk decreases, etc). It is all laid out super simply so that you can make these socks without much difficulty at all even if you just learned how to knit!


The resulting socks are super cozy, warm and durable! 


What you'll need to make these socks:
-200 yards of worsted weight yarn
-size US5 circular needles with a cord of at least 32"
-a tapestry needle
-This pattern! - I'm selling it for only $3! 

Or, if you would just like me to knit you a custom pair of socks, I can do that too! 

**Remember! Today's the last day of my Hello Spring Sale! Use code SPRING10 at checkout and receive 10% off anything in my shop!"

Happy Crafting!

Tuesday, 19 March 2013

How To Make A Light Box

For quite a while now I've been wanting a light box to help me photograph my Etsy items, but I've been putting this project off because I didn't have space for it, or I thought it would be a difficult project. Turns out, it's super simple to make a light box! And you save a lot of money by making your own instead of buying one too!

Here's how to do it:

What you'll need:
-A small box
-A white sheet you don't mind destroying
-Duct tape
-Scissors
-A box cutter or sharp knife
-Double sided tape
-Stapler

Step 1: Tape up the bottom of the box. Cut out 3 sides of the box, leaving about 1 1/2" as a frame. Cut off 3 box flaps from the front, leaving just the bottom one. 


Step 2: Put double sided tape everywhere! Corners, and top especially. Then comes the tricky part. Carefully start pressing your white sheet into the box, sticking it to the tape. Pulling tight to (try to) prevent wrinkles, and cutting excess fabric as you go. This might take some time. Also, try to only have seams at the corners. Use staples on the top for reinforcement against gravity- making sure that they are as inconspicuous as possible. 


Step 3: You have a light box! Now just add light sources. In the photo above I have placed the box by a sunny window. Notice how there aren't any really harsh shadows? Alternatively, you can put lamps facing toward each open side. The sheet will allow light in, while diffusing it to make it softer. 


 These photos are unedited to show you how great the box works. It allows for a simple background, and soft shadows, allowing your subject to pop! Here is an example of the same subject, same place, without the light box:

Dark shadow, harsh glare, busy background. You can really see how much a light box helps!

And lastly, here's the same photo from above, just edited a little:

I simply boosted the colours a little to make it stand out. Now just imagine this was an Etsy item- the picture would show off the product splendidly, no? 

Happy Crafting! 


Monday, 11 March 2013

Ten-Thousand Hours

Currently, one of my favourite artists is Macklemore & Ryan Lewis; I love their thoughtful, and thought-provoking, lyrics as well as their catchy beats. Their newest album The Heist is fantastic through-and-through, but one song in particular speaks to me most. Ten-thousand hours- it's about the concept that if you work hard at something for ten-thousand hours, then you become something of an expert in that subject. Malcolm Gladwell discusses this concept in his book The Outliers, which, by the way, is also fantastic.

My favourite lyrics from the song sum up the idea really well, I think, and are also really inspiring...


Practice makes perfect, and it's okay if in the beginning you aren't very good. With hard work and dedication, you can achieve your dreams. 

I plan on hanging this image in my office, in a black frame, just like my two other, recent, decor posts: "I Can't Do This; But I'm Doing It Anyway"; and "We Are The Makers Of What's Next". For this image, I simply Googled the base photo of black alligator skin (The Heist's album cover is also black alligator skin), and added the text in Photoshop. Easy-peasy. 

What songs do you listen to for motivation? 

Sunday, 10 March 2013

I Can't Do This; But I'm Doing It Anyway

Sometimes I find myself jumping into things that I don't feel ready for. I feel like I can't hack it, and others at times scoff at my crazy ideas, telling me I can't do it.

Thing is, it often works out pretty well. Just a month after starting culinary school I opened my catering business. My first gig was for a mayor-elect, and his campaign volunteers. Four-hundred people. It was a big deal. I was really nervous. Everything worked out fantastically and that gig allowed me to buy my first Kitchenaid mixer. I feel like I live a lot of my life this way.

So when I saw this blog post on Elise Blaha's blog 'Enjoy It', I was super inspired to make my own version. And I decided to make my own foam stamps- something I've never done before.

It's definitely messy, and imperfect, but that's the point, isn't it? I had never made any sort of stamps before this- I couldn't do it, but I did it anyway. I think this piece will be super motivational when I'm working on a particularly difficult project.

This is the second piece of decor I've made for my office space- and I can't wait to share more as I make them. Tell me- how is your work space decorated?

Friday, 8 March 2013

We Are The Makers Of What's Next

Recently, I moved into a new apartment with my husband. It's been a lot of work these past few weeks- packing, moving, unpacking, cleaning and organizing- to try and make this new (wonderful) place feel like home. Finally, we're at the point where we can live comfortably and start decorating! I'm very excited.

My first few decor projects are all going to be for my home office. I'm so happy to finally have my own little space, instead of having my crafting area crammed in the corner of our bedroom as it was in our old place. I'm really excited to make it an inspiring place, with inspiring pieces of art.

Here's my first project:
(Super wrinkled at the moment! I plan to flatten it out and then frame it in a simple black frame.) 

I used to love cross-stitching when I was a kid, but for some reason I hadn't picked up a cross-stitch project in years. 
Here's what inspired me: 

I saw this picture when I was searching on Google for vintage advertisements (I love vintage food advertisements as kitchen art!), and I knew immediately that I wanted to make a project out of it. I'm not a huge fan of orange, so I didn't want to just print and frame the image. Instead, I came across my huge stash of embroidery thread (which I often use when sewing my puppy coats), and the rest was history. I chose a pale blue, and a contrasting coral, and tweaked the image to create a cross-stitch pattern (this took a bit of time). I think it worked out pretty well, what do you think?

Do you have any inspirational quotes/images in your work space? If so, I'd love to hear about them in the comments below!

PS- If you'd like the pattern for yourself, it will be up in my Etsy shop this week! 


Friday, 1 February 2013

Super Long Black Infinity Scarf

Remember when I gave you a (small) tour of my craft area? Well I finally finished that knitting project that I was working on! It took about three weeks of casual knitting, but it's done! I probably could have gotten it done sooner, but we're moving in fifteen days so I've been crazy busy packing! 


It's super long! It measures about 72" in circumference and is about 11" wide. 


It can be worn as a long scarf...


Or as a pretty shawl...


Or as a hood and neck warmer!


I made up the basket weave (at least that's what I'm calling it) pattern as I went. It's pretty simple, I cast on 172 double stranded stitches, then just k2p2 for 5 rounds, then switched to p2k2, for 5 rounds. I did this 6 times for this width and used size US13 (9mm), 36" circular needles, with double strands of black worsted weight yarn. 

However, if you don't knit, or don't have the time for this project, but still want one before winter is over, you can purchase one from my Etsy shop

Happy Crafting!


Sunday, 13 January 2013

Cobalt Blue Infinity Scarf


I had a ton of fun making this! I love the different textures in it- the ribbing on the top edge, the rolled bottom edge, and the smooth inbetween. It's a rich cobalt blue, which the pictures don't do justice. It's super cozy and warm, and very versatile. I love it paired with an all black outfit, as a statement piece, or paired with a long blue and black sweater dress (picture two gives you a peek of that). Hopefully I'll be getting a mannequin or dress form of some sort soon so I can take better, full length pictures. 

Until then, I'm off to knit another of these in black, in a basket weave pattern! 

<3